The mentioned functionalities may be restricted depending on the purchased software license.
Publieke Weergave Sjabloonbeheer
Publieke weergave sjablonen zijn de basis van uw aangepaste visualisaties. Ze definiëren de indeling, structuur en visuele elementen die op uw installaties worden toegepast. Deze uitgebreide gids behandelt alles, van de basiscreatie van sjablonen tot geavanceerde ontwerptechnieken.
📋 Overzicht
Wat zijn Publieke Weergave Sjablonen?
Sjablonen dienen als herbruikbare blauwdrukken die:
- 📐 Visuele indelingen voor uw publieke weergaven definiëren
- 🧩 Inhoudsblokken en hun positionering organiseren
- 🎨 Ontwerpconsistentie over meerdere installaties vaststellen
- ⚙️ Versneld implementatie van gestandaardiseerde visualisaties mogelijk maken
- 🔄 Eenvoudige updates ondersteunen over alle gekoppelde configuraties
Belangrijkste Voordelen
| Voordeel | Beschrijving |
|---|---|
| 🚀 Efficiëntie | Een keer maken, gebruiken in meerdere installaties |
| 🎯 Consistentie | Uniforme ontwerpnormen handhaven |
| 🔧 Flexibiliteit | Eenvoudige aanpassing zonder vanaf nul opnieuw te maken |
🚀 Aan de Slag
Sjabloon Workflow
- 📐 Ontwerp Indeling - Plan uw visuele structuur
- 🎨 Maak Sjabloon - Bouw met de sjabloon editor
- 💾 Sla Sjabloon op - Bewaar voor hergebruik in installaties
Vereisten
Voordat u sjablonen maakt, zorgt u ervoor dat u:
- ✅ SmartgridX-account met de juiste machtigingen
- ✅ Duidelijke ontwerptdoelen voor uw visualisatie
- ✅ Inhoudseisen (afbeeldingen, datapunten, lay-outs)
🎛️ Sjabloonbeheerinterface
Toegang tot de Sjabloonmanager
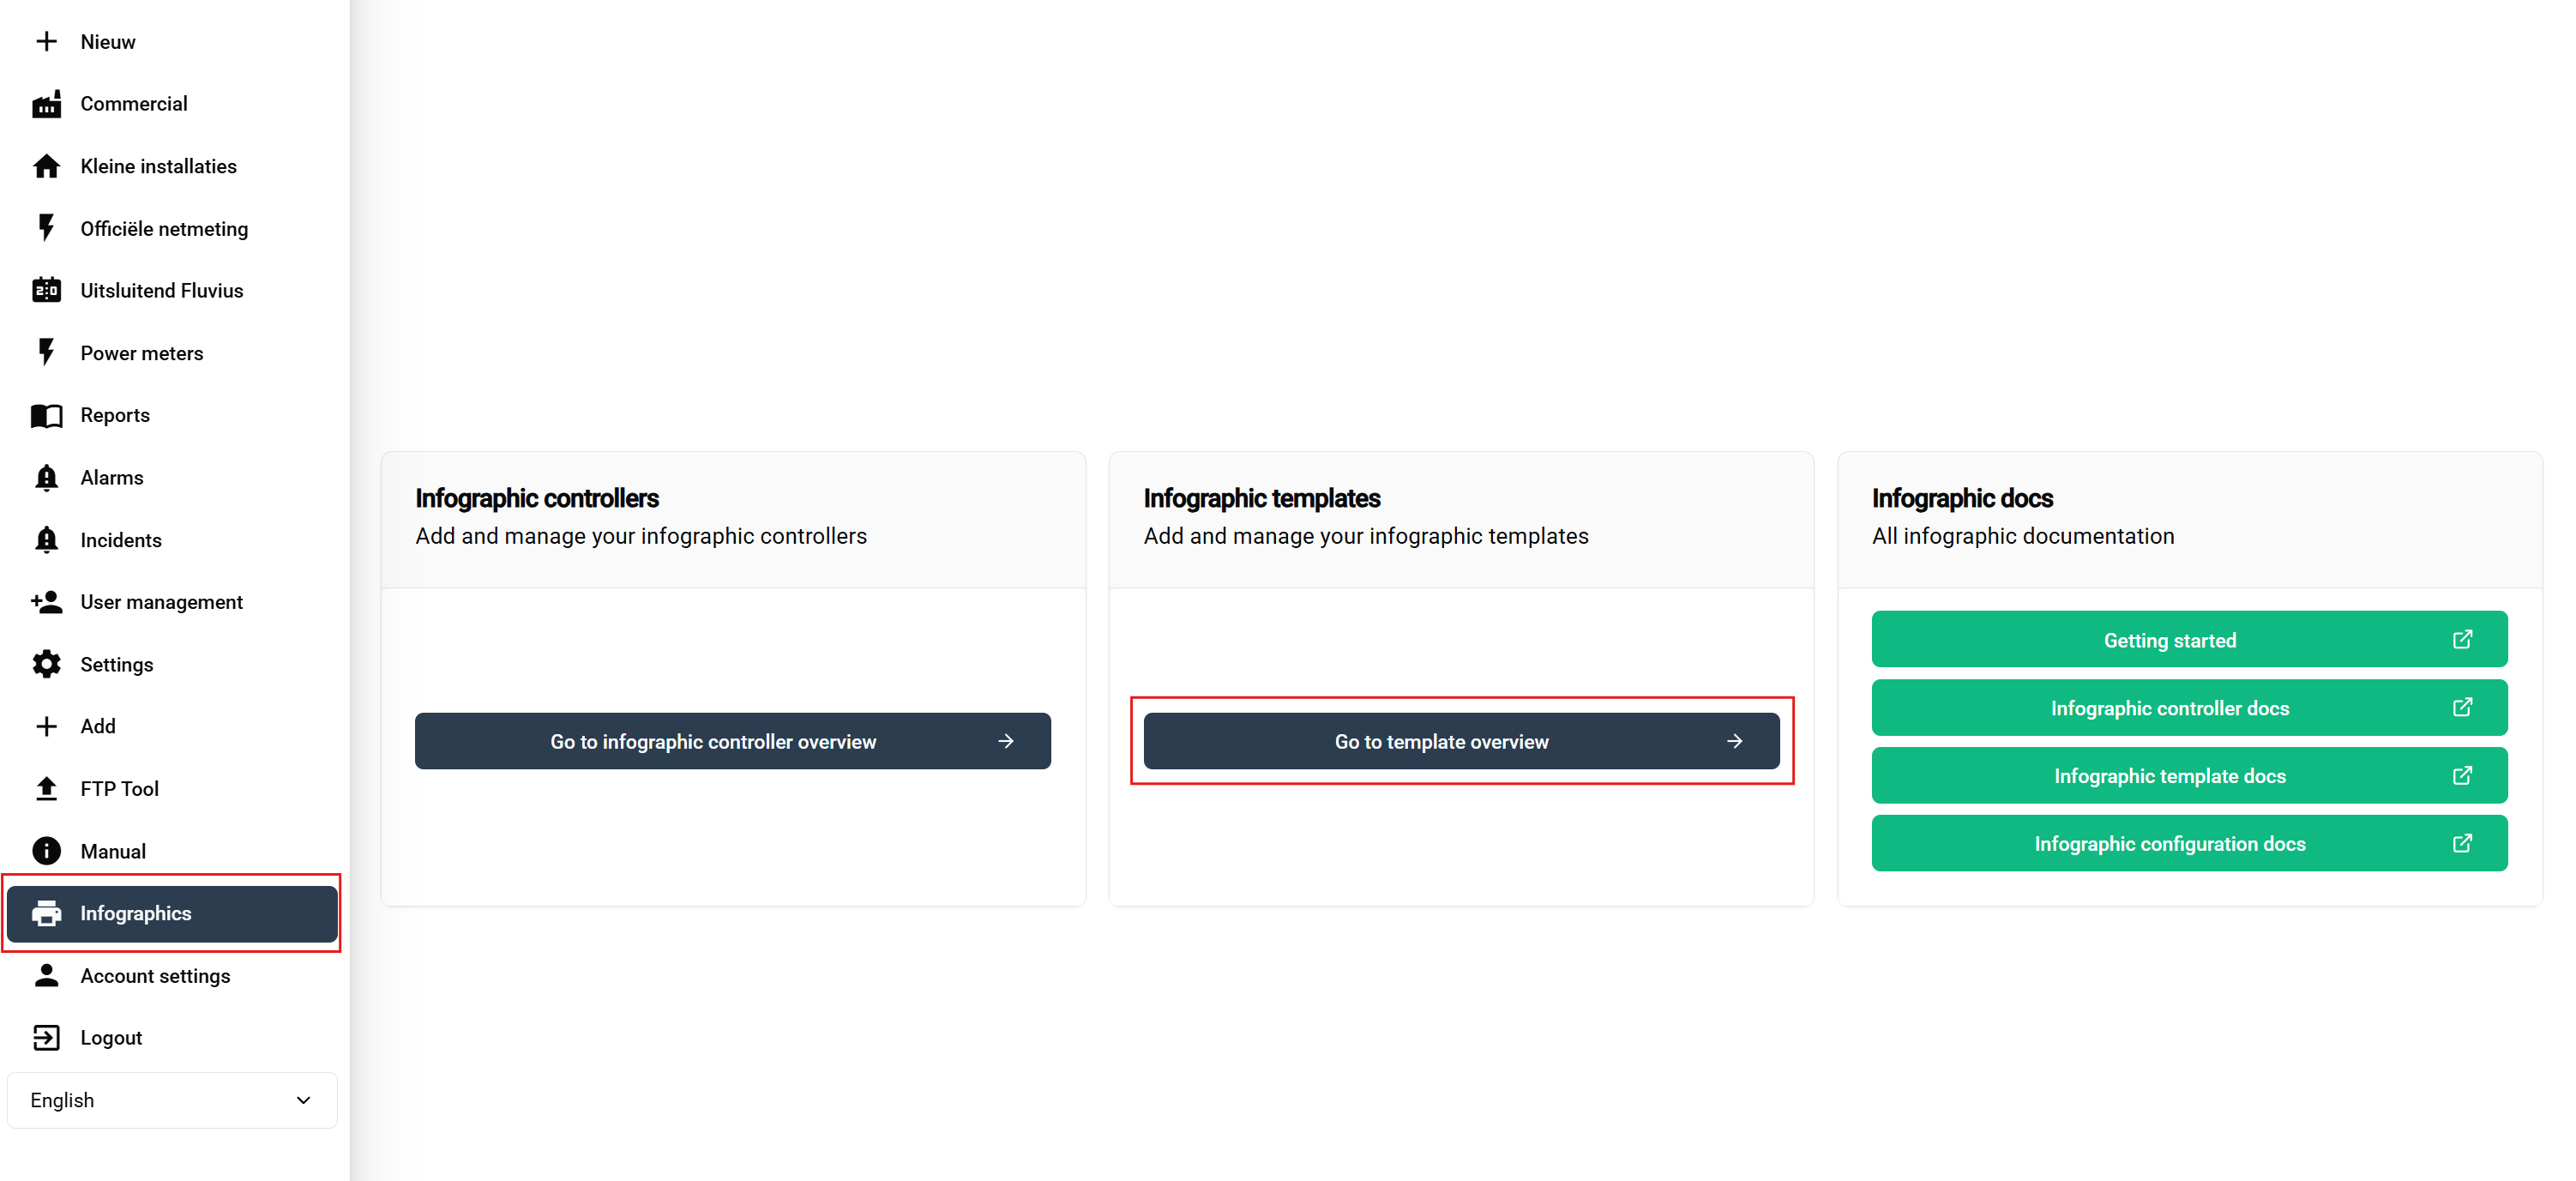
Navigatiestappen:
- Log in op uw SmartgridX-account
- Navigeer naar 'Publieke weergaven' in de hoofdzijbalk
- Klik op de 'Publieke Weergave Sjabloon' knop op de overzichtspagina
Dit opent de sjabloonbeheerinterface waar u sjablonen kunt bekijken, maken, bewerken en verwijderen.
Sjabloon Overzicht Tabel

Beschikbare acties:
- ➕ Toevoegen - Groene knop om de sjabloon creatie te starten
- ✏️ Bewerken - Wijzig het ontwerp van het bestaande sjabloon
- 🗑️ Verwijderen - Verwijder ongebruikt sjabloon
🎨 Sjabloon Creatie Proces
Een Nieuw Sjabloon Starten
Klik op de "Nieuwe Sjabloon Maken" knop om de sjabloon editor interface te openen.
Sjabloon Header Configuratie
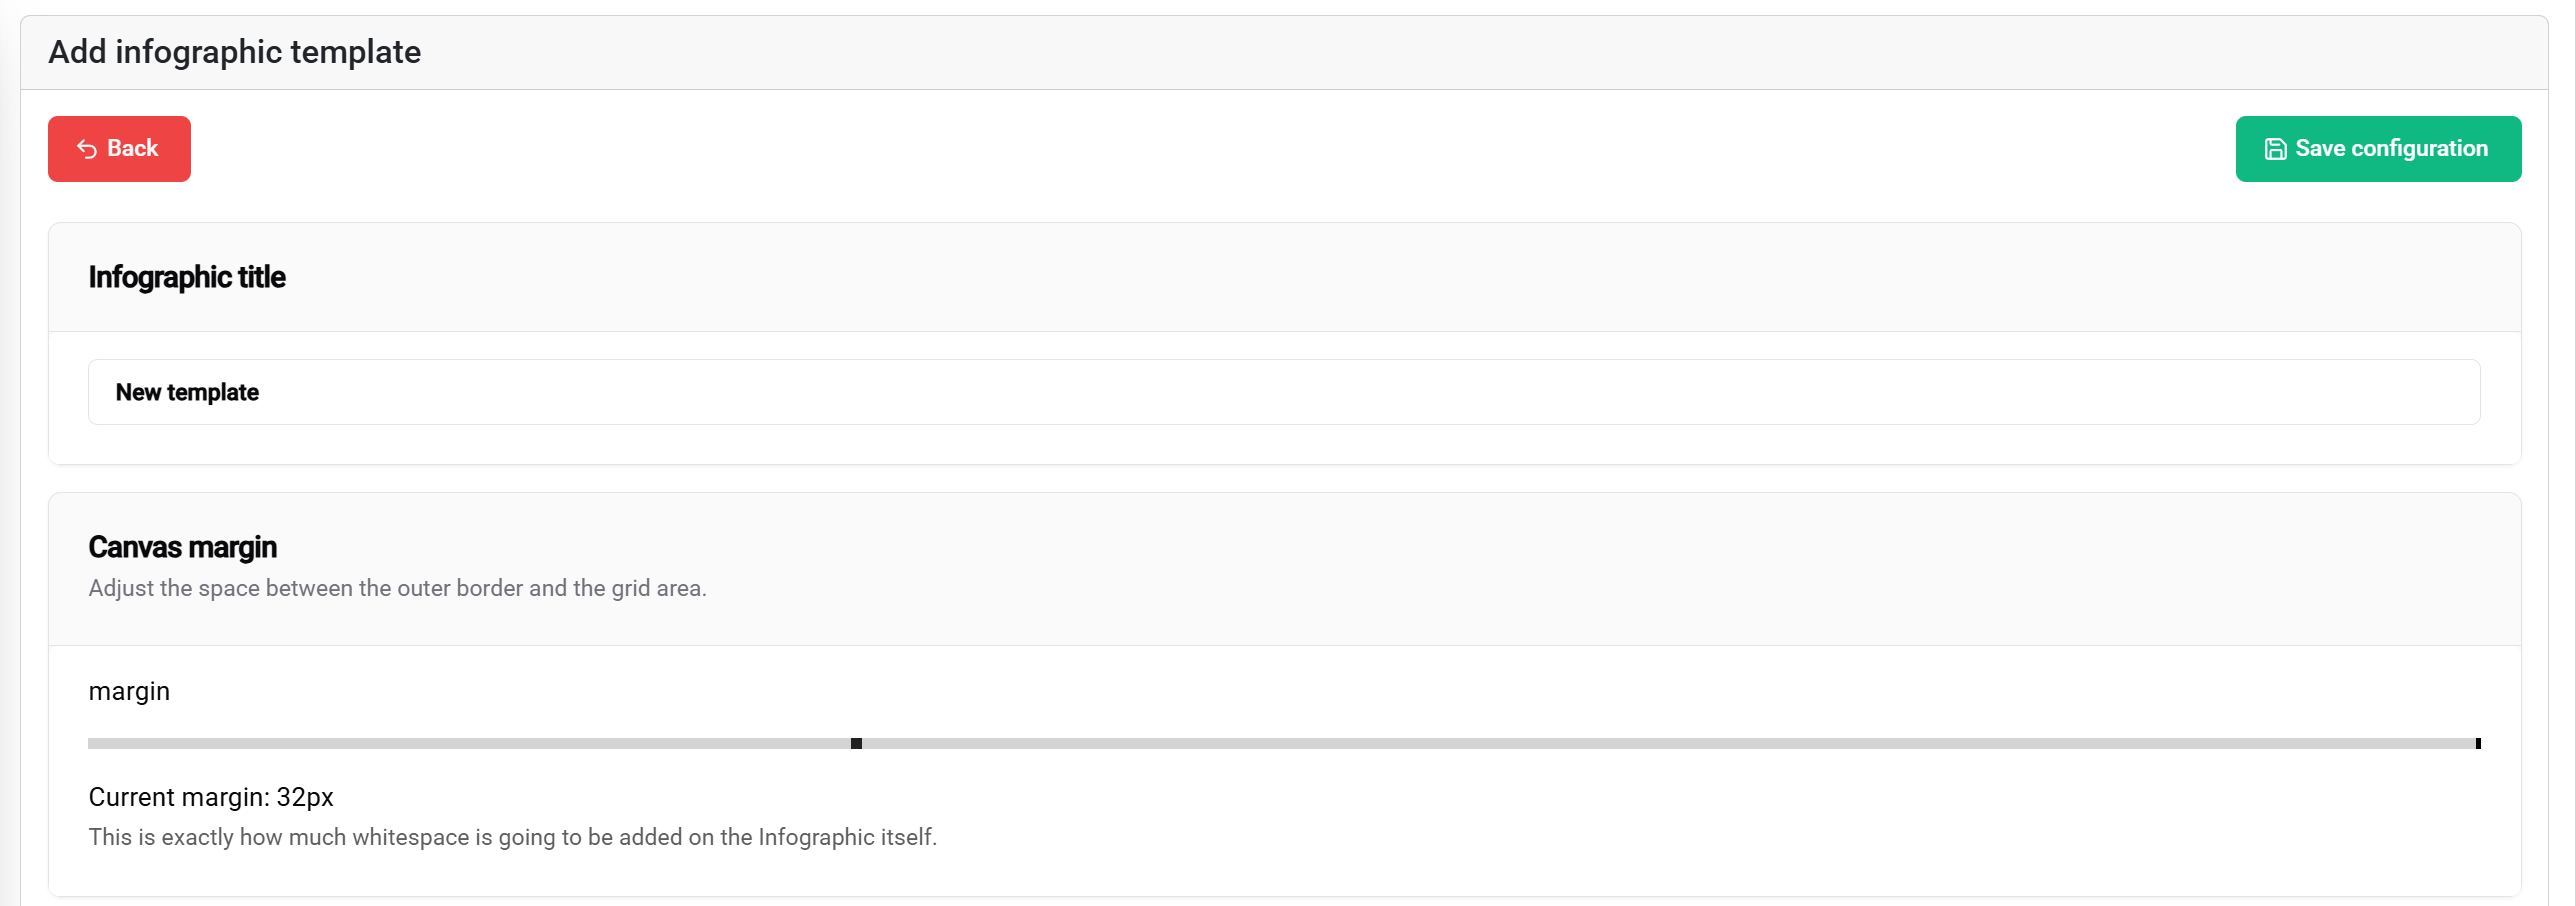
Titelinstellingen
Sjabloontitel:
- Doel: Identificeert het sjabloon in lijsten en configuraties
- Best practices: Gebruik beschrijvende, project-specifieke namen
- Voorbeelden: "Fabriek-KPI-Dashboard", "Energie-Monitoring-Layout", "Multi-Zone-Weergave"
Marginale Configuratie
Marges instellen definiëren het veilige gebied van de displayranden:
Marge Slider (0-100px):
- 📐 Bereik: 0 tot 100 pixels vanaf de rand van de display
- 🎯 Doel: Creëert veilige ruimte om afsnijden van inhoud te voorkomen
- 📱 Toepassing: Zorgt voor zichtbaarheid op verschillende type displays
- ⚙️ Aanbeveling: Gebruik 10-20px voor standaard displays, 30-50px voor edge-to-edge schermen
Visuele impact:
- 0px marge - Inhoud strekt zich uit tot de randen van de display
- 50px marge - Inhoud begint 50 pixels van alle randen
- 100px marge - Maximale veilige ruimte met aanzienlijke randruimte
Opslaan Functionaliteit
De 💾 Opslaan knop (rechtsboven) staat u toe uw huidige sjabloon op te slaan.
🧩 Blokindelingssysteem
Het Grid Systeem Begrijpen
Basisprincipes van het Grid
De sjabloon editor gebruikt een 100×100 procent-gebaseerd grid systeem:
Grid Eigenschappen:
- 📐 Afmetingen: 100 eenheden breedte × 100 eenheden hoogte
- 📊 Eenheden: Percentage waarden (1 eenheid = 1% van de totale dimensie)
- 🎯 Precisie: Maakt exacte positionering en sizing mogelijk
- 📱 Responsief: Past zich automatisch aan verschillende schermformaten aan
Voorbeelden van Blokindelingen
- 🖼️ Enkel Blok
- 📊 Tandem
- 📚 Gestapelde Indeling
- 🔲 Quadrant Indeling
Configuratie: 100 breedte × 100 hoogte
Resultaat: Volledig scherm beslaan
Gebruikscase: Enkel grote visualisatie, volledig scherm afbeelding
┌─────────────────────────────────┐
│                                 │
│         VOLLEDIG BLOK           │
│                                 │
│                                 │
└─────────────────────────────────┘
Configuratie: Twee blokken op 50 breedte × 100 hoogte
Resultaat: Verdeeld scherm indeling
Gebruikscase: Vergelijkingsweergaven, dubbele datavisualisaties
┌─────────────────┬───────────────┐
│                 │               │
│    BLOK 1      │   BLOK 2     │
│                 │               │
│                 │               │
└─────────────────┴───────────────┘
Configuratie: Twee blokken op 100 breedte × 50 hoogte
Resultaat: Verticale stapel
Gebruikscase: Header/inhoud, titel/details indelingen
┌─────────────────────────────────┐
│            BLOK 1               │
│                                 │
├─────────────────────────────────┤
│            BLOK 2               │
│                                 │
└─────────────────────────────────┘
Configuratie: Vier blokken op 50 breedte × 50 hoogte
Resultaat: Kwadranten indeling
Gebruikscase: Multi-metrische dashboards, vergelijkingsgrid
┌─────────────────┬───────────────┐
│    BLOK 1      │   BLOK 2     │
│                 │               │
├─────────────────┼───────────────┤
│    BLOK 3      │   BLOK 4     │
│                 │               │
└─────────────────┴───────────────┘
Blokmanipulatie
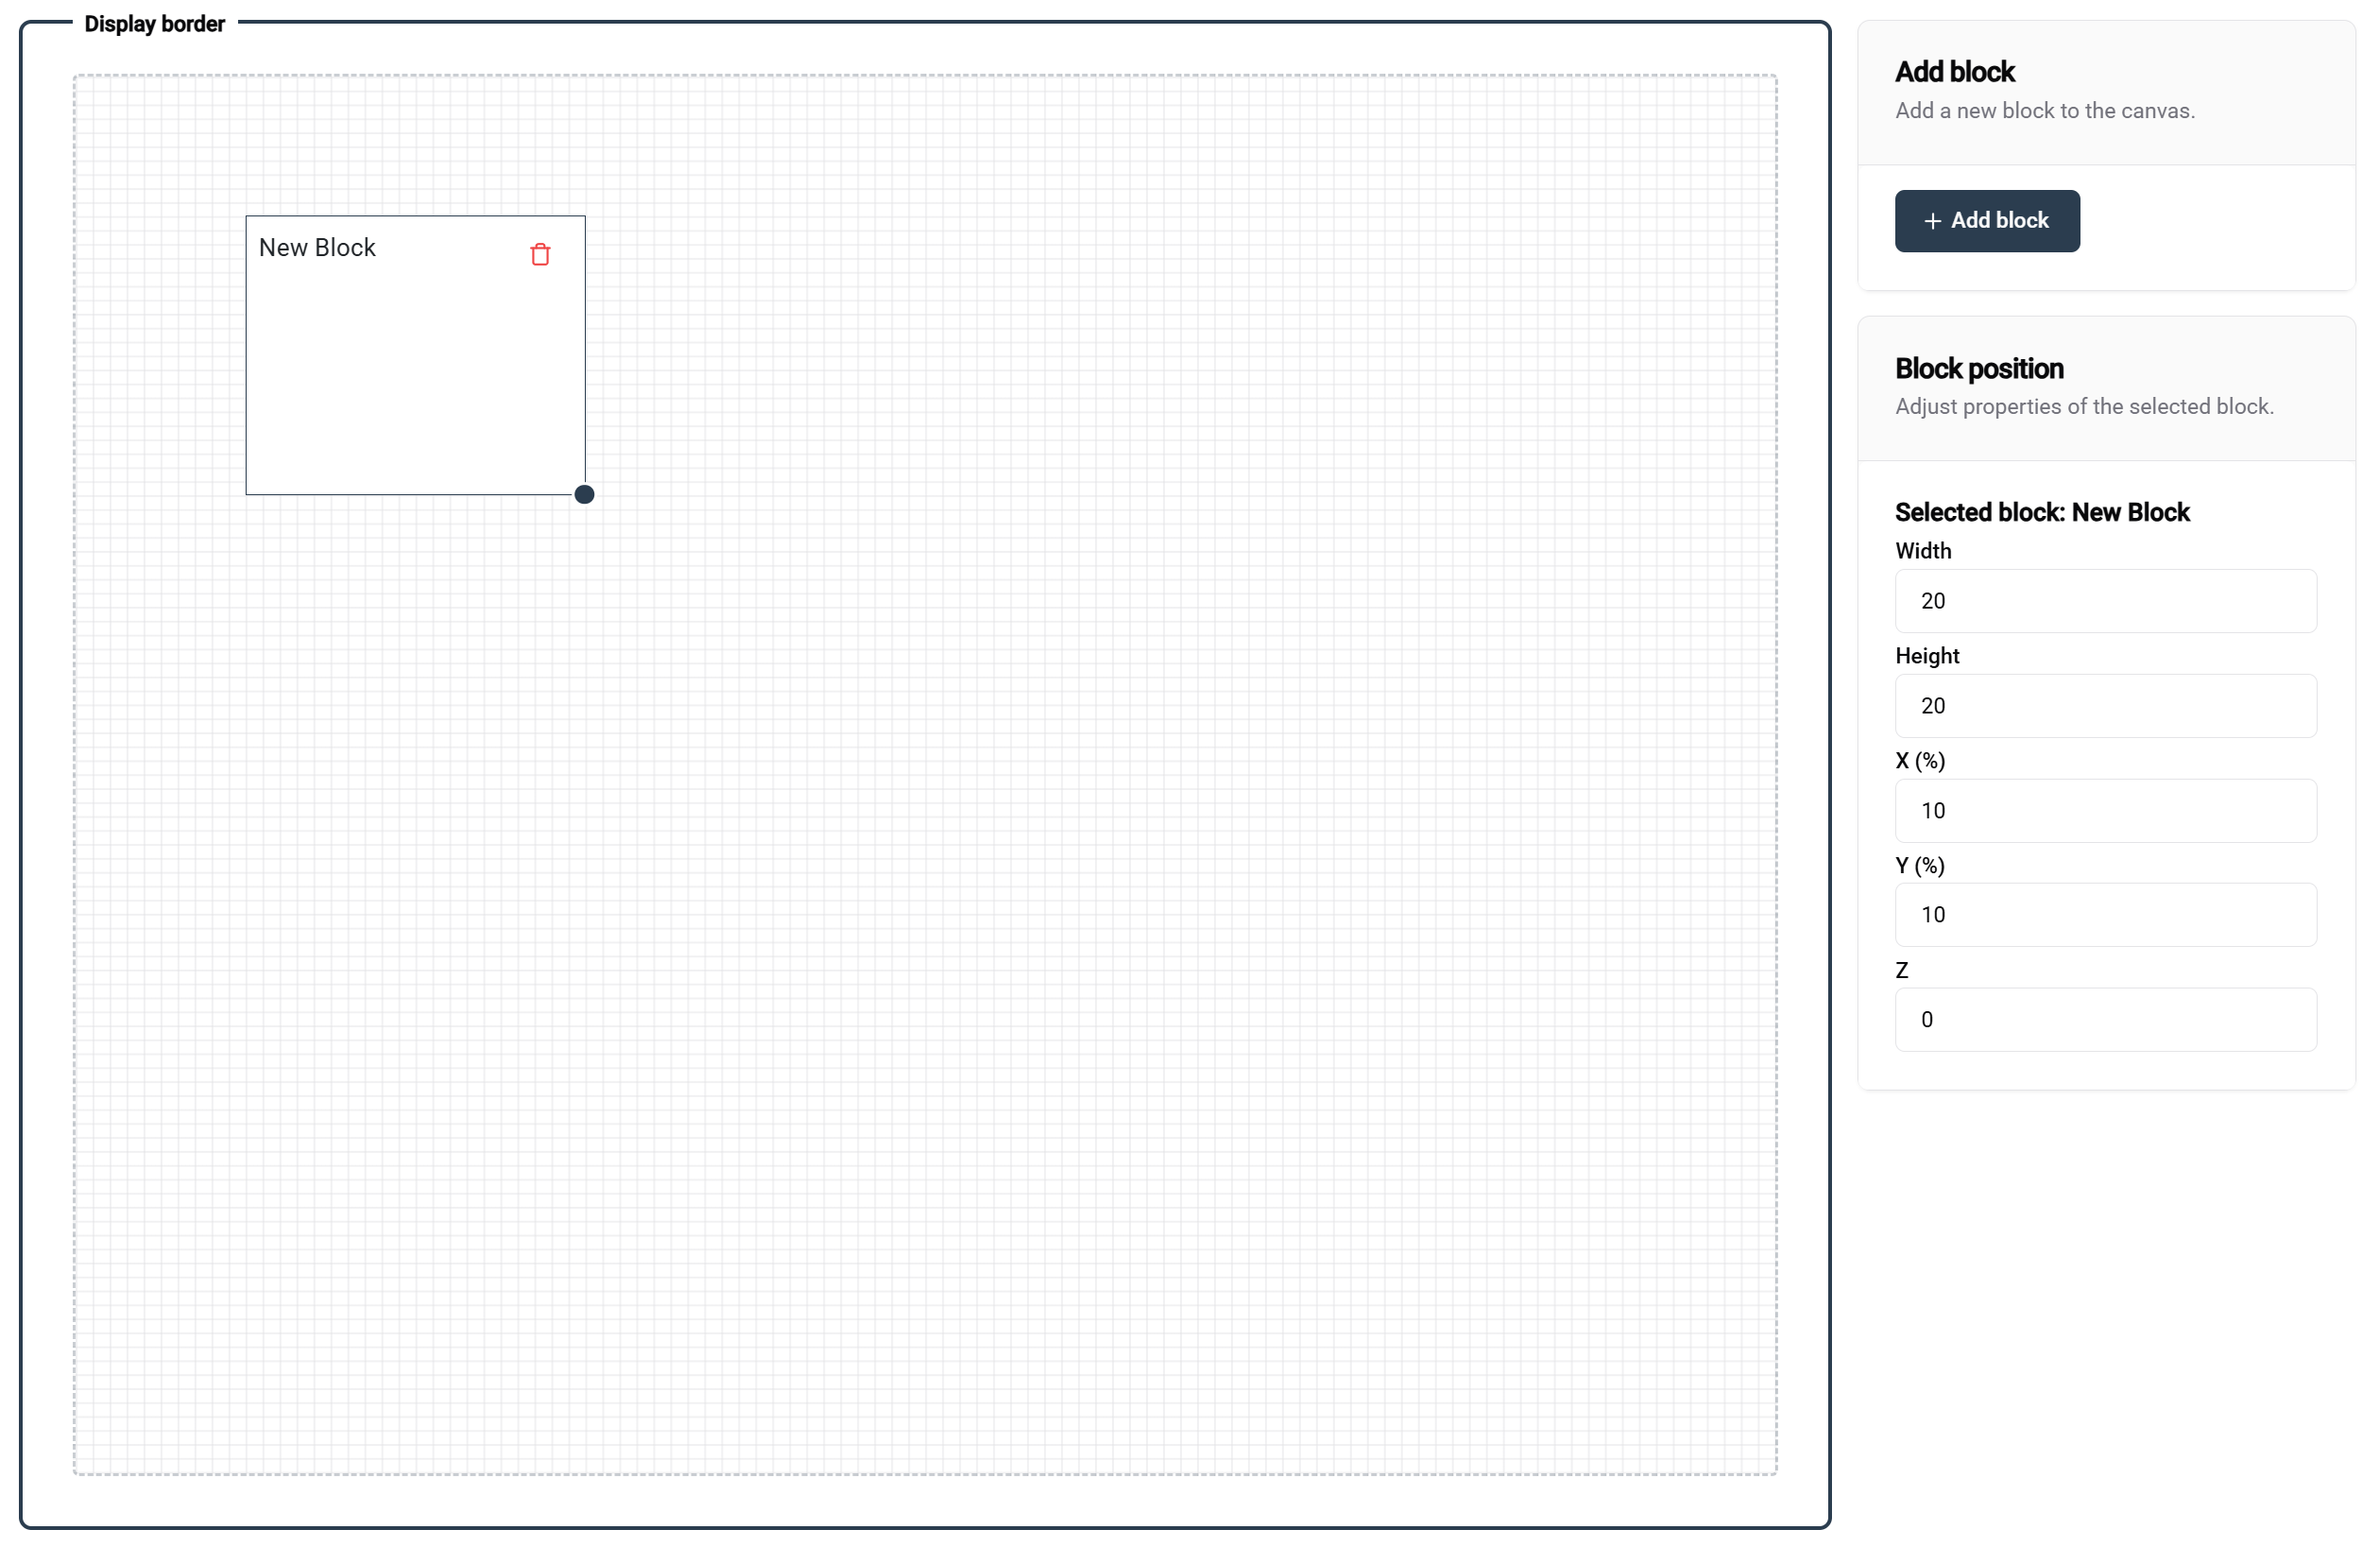
Blokken Toevoegen
Methode: Klik op de "Blok Toevoegen" knop (rechtsboven van de editor)
Resultaat: Nieuw blok verschijnt met standaardafmetingen
Volgende stappen: Positioneer en wijzig de grootte zoals nodig
Blokken Positioneren
Sleep en Laat Los:
- 🖱️ Klik en houd een blok vast om het te verplaatsen
- 📍 Voorbeeld in realtime toont de positie tijdens het slepen
- 🧲 Grid vastklikken helpt bij nauwkeurige uitlijning
- 👁️ Visuele hulplijnen verschijnen om te helpen met uitlijning
Blokken Wijzigen
Resize Handvat:
- 📐 Rechtsonder toont het resize handvat wanneer het blok is geselecteerd
- 🔧 Sleep om zowel breedte als hoogte gelijktijdig te wijzigen
- 📊 Voor waarden in realtime tonen de huidige afmetingen
Precisiecontroles
Rechter Paneel voor Positie
Wanneer een blok is geselecteerd, biedt het rechterpaneel:
Positiecontroles:
- 📍 X-positie - Horizontale offset van de linkerrand (0-100)
- 📍 Y-positie - Verticale offset van de bovenrand (0-100)
- 🎨 Z-index - Laagvolgorde voor overlappende blokken
- 📏 Breedte - Percentage van de blokbreedte (1-100)
- 📏 Hoogte - Percentage van de blokhoogte (1-100)
⚙️ Blokconfiguratie
Bloktypes en Eigenschappen
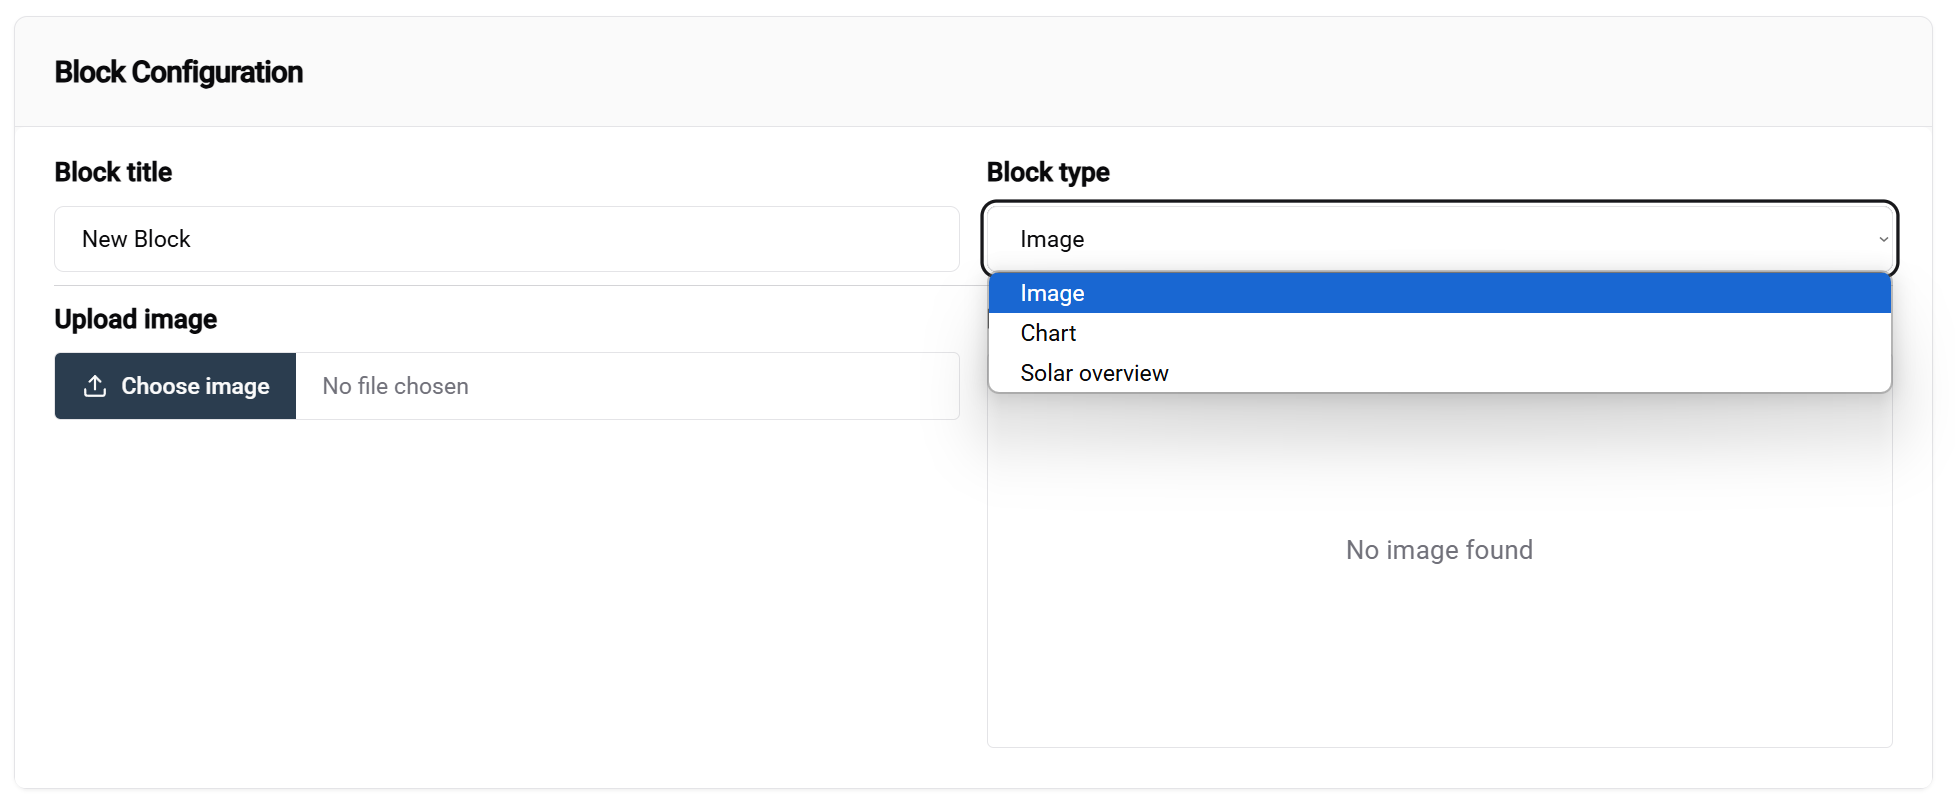
Toegang tot Blokconfiguratie
Methode:
- Selecteer een blok in het editor canvas
- Configuratiepaneel verschijnt onderaan het scherm
- Dropdown voor bloktype is de primaire configuratie-optie
Opmerking: Niet alle blokken zijn momenteel configureerbaar. Dit zal veranderen naarmate de ontwikkeling voortduurt. Meer bloktypen zullen in toekomstige updates worden toegevoegd.
Beschikbare bloktypen
- 🖼️ Afbeeldingsblok
- ☀️ Zonoverzicht
- 📈 Grafiekblok
Doel: Statische afbeeldingen, logo's, achtergronden, GIF's weergeven
Configuratie-opties:
- 📁 Afbeeldingsbron - Upload of URL die als standaard voor dit blok zal worden gebruikt. Je kunt dit leeg laten als je wilt dat een afbeelding in de configuratie moet worden geselecteerd
Toepassingsgevallen:
- Bedrijfslogo's en branding
- Achtergrondafbeeldingen
- Apparatuurfoto's
- GIF's
Doel: Realtime waarden weergeven
Toepassingsgevallen:
- Snelle overzicht van je zonne-energie gegevens
Doel: Gegevens trends en vergelijkingen visualiseren
Configuratie-opties:
- 📊 Grafiektype - Lijn, staaf
Toepassingsgevallen:
- Visualiseer realtime productie- en energiedata
Voorbeeldsjablonen
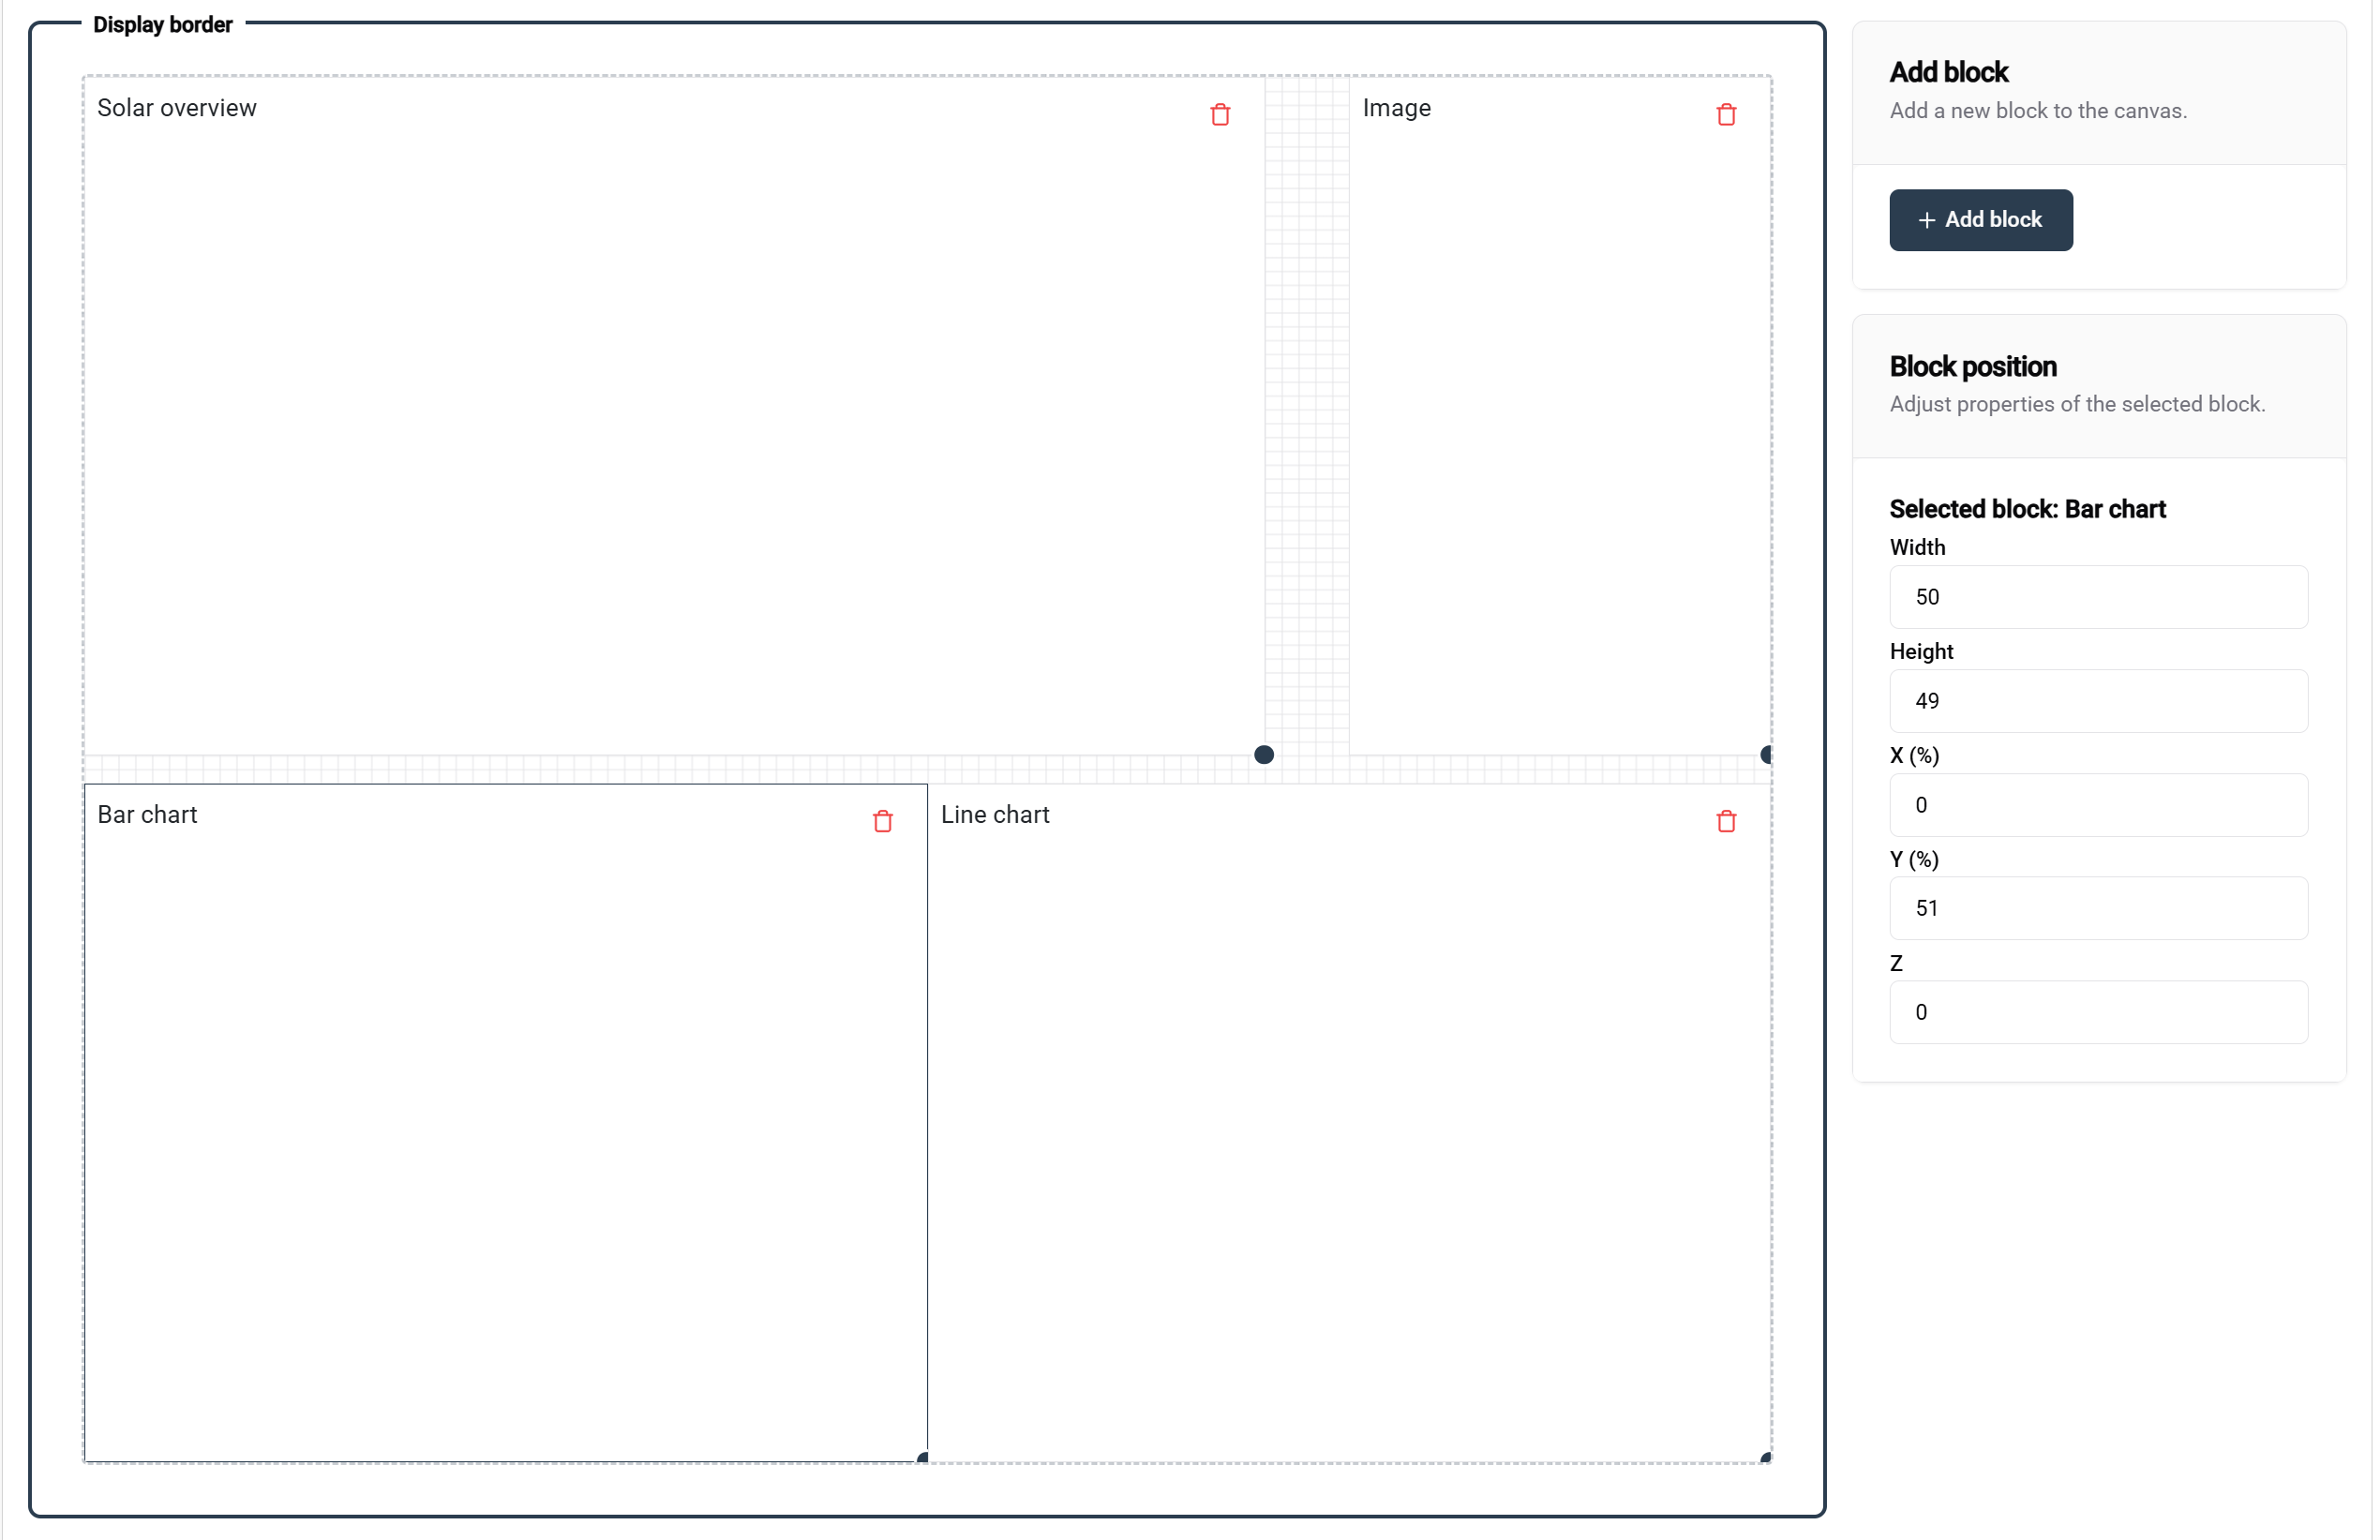
Dit voorbeeld toont een goed gestructureerd sjabloon met:
- 📊 Duidelijke blokorganisatie met beschrijvende labels
- 📐 Juiste afstand en uitlijning
- 🎯 Functionele bloktypen voor verschillende inhoudsbehoeften
Bloknamen in dit voorbeeld:
- Elk blok toont zijn bedoelde doel
- Duidelijke labeling helpt bij de configuratie
- Logische organisatie ondersteunt het onderhoud
📚 Gerelateerde documentatie
Volgende stappen
Na het maken van je sjabloon:
- ⚙️ Configureer installaties - Pas sjablonen toe op specifieke installaties
- 🎛️ Koppel controllers - Verbinden met weergavehardware
- 🚀 Inleidende gids - Volledige workflow-overzicht
Geavanceerde onderwerpen
- 🎨 Geavanceerde ontwerptrucs
- 📊 Aangepaste gegevensintegratie
- 🔄 Geautomatiseerde sjabloonupdates
- 👥 Samenwerking aan sjablonen met meerdere gebruikers
💡 Samenvatting van beste praktijk
Sjabloonontwerp
✅ Ontwerpprincipes:
- 🎯 Houd het eenvoudig - Focus op essentiële informatie
- 📱 Ontwerp responsief - Test op verschillende schermformaten
- 🎨 Handhaaf consistentie - Gebruik gestandaardiseerde kleuren en indelingen
Sjabloonbeheer
✅ Organisatietips:
- 📝 Gebruik beschrijvende namen - Maak sjablonen gemakkelijk te vinden
- 🔄 Regelmatig onderhoud - Verwijder ongebruikte sjablonen
- 👥 Deel standaarden - Zorg voor consistentie binnen het team
🎨 Klaar om te ontwerpen? Met je sjabloon gemaakt en geconfigureerd, ben je klaar om verbluffende visualisaties te implementeren in je SmartgridX-installaties!